Perspective Drawing Basics
- Get link
- X
- Other Apps
Perspective Drawing Basics
The theory
Rays of light and the eye
Why does a tree that is 30 feet away appear smaller than one that is only 15 feet away? In order to explain this phenomenon, we first need to use a simple model to understand how our eyes work.
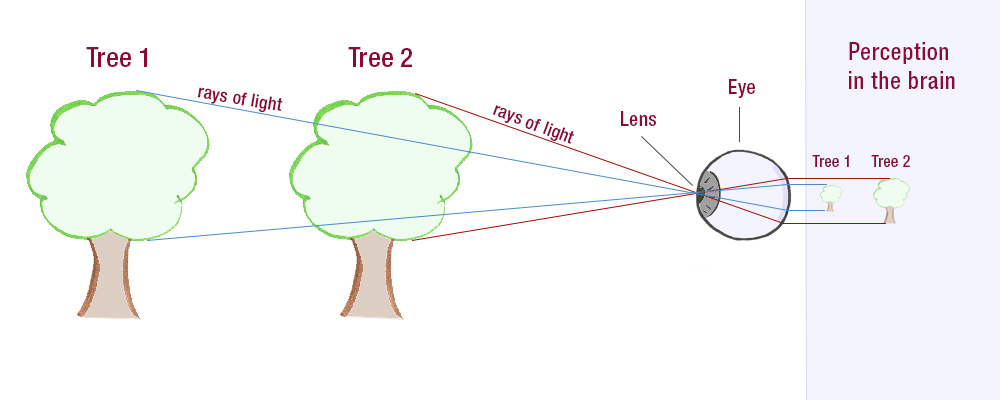
We perceive our surroundings through rays of light that enter our eyes. These always meet the same point in our eye, where they are then refracted and projected onto our retina. Because of this, the rays of light from a tree that is further away reach our eyes at a sharper angle than a tree that is directly in front of us. As a result, we get a mirror image on the retina: A small tree and a large tree. After our brain processes this information, it turns the picture right side up and knows that one of the trees is further away.
A painted picture, however, cannot transport light rays to our eyes at different angles. That’s why it’s necessary for us to create our drawing how it is perceived after it’s processed by our eyes. Perspective drawing helps us with this.
The basic elements of perspective drawing
In order to understand human perception, there are three important tools for perspective drawing: The horizon line, vanishing points, and vanishing lines.
The horizon line
Although the earth is round, the horizon line appears to us as a clear separation between the ground and the sky. Usually it is covered by trees, hills, or buildings and we don’t consciously notice it. Only looking at the ocean clearly shows us the horizon line. The horizon line plays an important role in drawings. It demarcates the ground, which represents the foundation for us. If we want to convey three-dimensionality, we always need to use this foundation as a reference.

The horizon line is always at the eye level of the viewer. However, viewers can have different heights, which means the height of the horizon line will shift. That is why a distinction is made among three different perspectives: The bird’s-eye view, the normal perspective (based on ourselves), and worm’s-eye view.

The vanishing points and vanishing lines
The vanishing point is where all parallel lines intersect and is always on the horizon line. Using the example of a straight road clearly illustrates what this means. Imagine a street with a consistent width that stretches into the distance. If you look directly at the street from above, both sides form parallel lines. However, if you stand on the street and look into the distance, the two lines seem to converge.

Just as with the horizon line, there are different perspectives for the vanishing points. However, it is important to know that both variants can be combined with each other.
TWO-POINT PERSPECTIVE
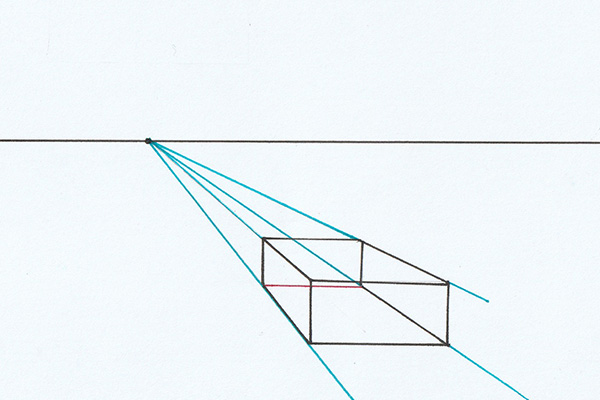
In the two-point perspective, also known as the corner perspective, there are two vanishing points along the horizon line. This is usually used when the viewer looks at the corner of an object. This corner divides the picture. Each side follows its own vanishing point.
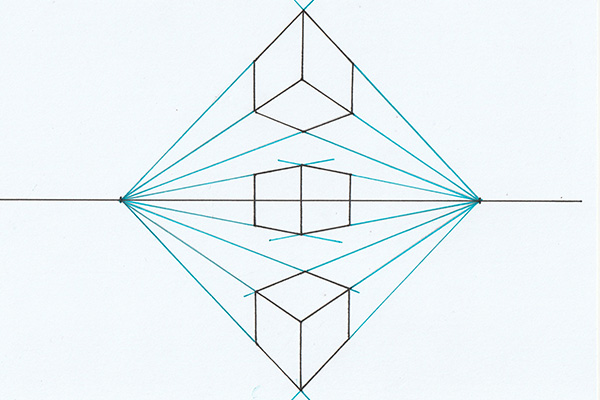
The perspectives of the vanishing points can be combined with the perspectives of the horizon lines. In our example you see all three horizon line perspectives combined with the two-point perspective.
THREE-POINT PERSPECTIVE
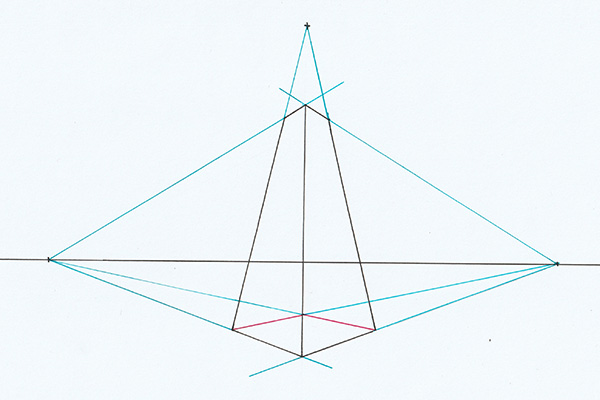
If you want to give the viewer of your picture the feeling of height and depth, you can add another vanishing point. All vertical lines lead to this point. It is an extension of the two-point perspective.
PERSPECTIVE DRAWING
Perspective Drawing is a technique used in art and design to represent three-dimensional images on a two-dimensional picture plane.

(swipe the image back and forward to view)
Perspective Drawing is a technique used to represent three-dimensional images on a two-dimensional picture plane. In our series of lessons on perspective drawing we explain the various methods of constructing an image with perspective and show how these are used by artists and illustrators.
"Perspective is to painting what the bridle is to the horse, the rudder to a ship……………..There are three aspects to perspective. The first has to do with how the size of objects seems to diminish according to distance: the second, the manner in which colors change the farther away they are from the eye; the third defines how objects ought to be finished less carefully the farther away they are." (Leonardo da Vinci)
Perspective was developed in the 15th century by the architects, Leon Baptista Alberti (1404-72) and Filippo Brunelleschi (1377-1446). For 500 years, perspective drawing remained one of the basic principles of Western art until it was challenged by the ideas of the Cubists at the start of the 20th century. Whether you are working with conventional materials such as pencils and paints or contemporary digital media, a knowledge and understanding of perspective drawing remains an essential tool to help you enhance your drawing technique.
There are two main elements in perspective drawing:
- Linear Perspective which deals with the organization of shapes in space.
Aerial Perspective (also called Atmospheric Perspective) which deals with the atmospheric effects on tones and colors. See our separate painting lesson on Aerial Perspective.
You can see how both of these elements work in our illustration of some ancient ruins. The black and white image displays an example of Linear Perspective. It shows some of the lines of construction used to arrange the blocks and columns to create an illusion of depth and distance.
If you swipe across the black and white image it will reveal a colored and textured rendering of the scene. This displays the atmospheric effects of Aerial Perspective. You can see how the tones weaken and the colors pale as they recede from your view. Both linear and aerial perspectives combine to create this convincing illusion of three dimensions on a two dimensional plane.
Basics of perspective drawing and perspective rulers -Basic perspective rulers 1-

CLIP STUDIO PAINT 1.9.9
[1] Perspective drawing
First, let us explain what perspective drawing is.
Perspective drawing is a technique used to depict spatial depth, or perspective. In other words, it allows you to accurately draw a three dimensional object onto a two dimensional plane.
There are typically three types of perspective drawing: one-point perspective, two-point perspective, and three-point perspective.
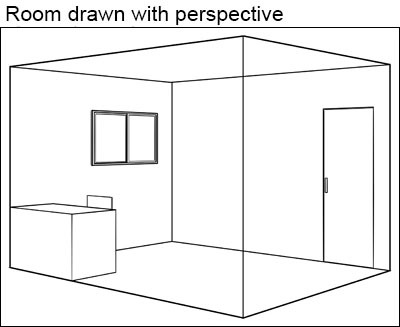
One-point perspective:
One-point perspective is often used for compositions that look at objects from the front.
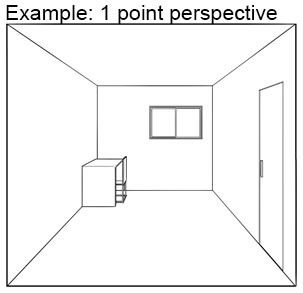
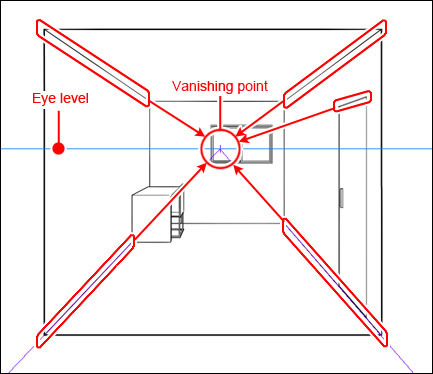
Lines extending from the foreground to the background gather (converge) at one point. The point of convergence is called the “vanishing point”.
The vanishing point will always be on the horizontal line, or “eye level” of the scene, which represents the height of the eye or camera of the observer.
Two-point perspective:
Two-point perspective is used for compositions that look at objects at an angle. As it is close to what the human eye normally sees, it is the most used perspective when drawing manga backgrounds and illustrations.

In one-point perspective, lines converged on one point from the background to the foreground. In two-point perspective, in addition to depth, lines representing width also converge.
As seen in the example below, two lines going in different directions converge on their respective vanishing point.
Hence the name “two-point perspective”. Even in two-point perspective, vanishing points are on the eye level.

Three-point perspective:
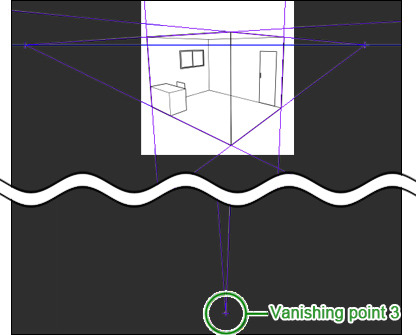
Three-point perspective is used for drawing compositions that are looking up at a large object or looking down from a high place.
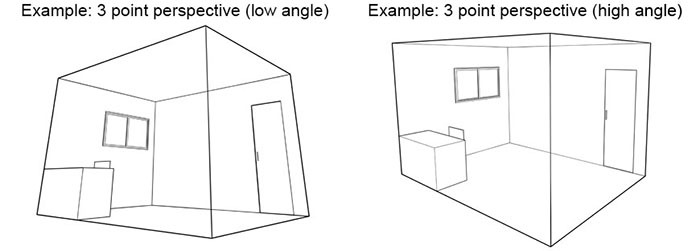
In two-point perspective, lines representing depth and width converge on two separate vanishing points.
In three-point perspective, lines representing height stretch toward a third vanishing point.
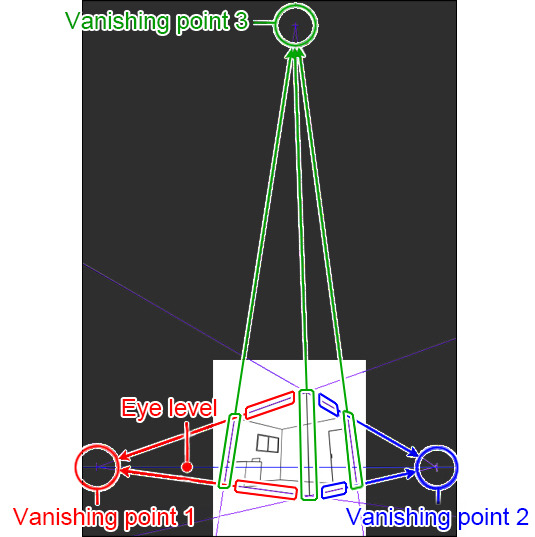
For compositions that are looking up, the height vanishing point is above the object.
When looking down, the height vanishing point is below the object.
[2] Perspective rulers
In CLIP STUDIO PAINT, lines that follow perspective can easily be drawn freehand with pens and other drawing tools by using the [Perspective ruler].
Here, we will explain how to use the perspective ruler to draw in each type of perspective.
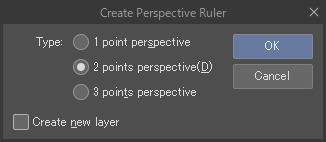
*1. Creating perspective rulers
The [Create Perspective Ruler] dialog can be displayed by selecting [Layer] menu→[Ruler]→[Create Perspective Ruler].
In the [Create Perspective Ruler] dialog’s “Type”, select a type of perspective and click [OK] to create a perspective ruler.
If “Create new layer” is selected, a perspective ruler will be created on a new raster layer.
If not, a perspective ruler will be created on the selected layer.

After creating a perspective ruler, move the eye level and vanishing point to set up the perspective.
The current tool will automatically be set to the [Object] tool after creating the ruler. Click on a section of the perspective ruler.
Control handles will be displayed, enabling movement of the eye level and vanishing points.
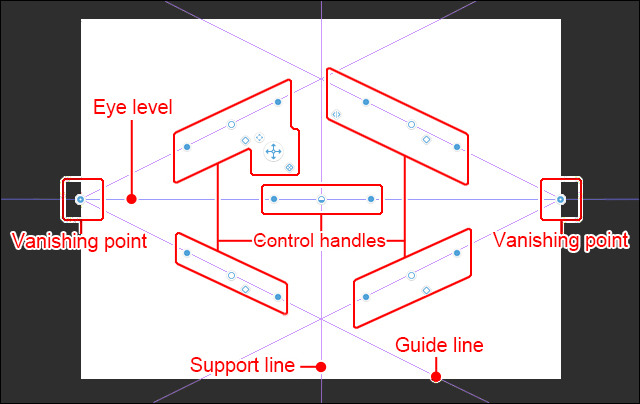
*2. Perspective ruler terminology
[Eye level]……The height of the eyes or camera of the person viewing the scene.
It will match the horizontal line(or horizon) on the canvas. Anything above the eye level will be a composition where the viewer is looking up, and anything below it will be looked down upon.
[Vanishing point]……The point(s) where an object’s width, depth, and height lines converge.
Vanishing points of width and depth lines parallel to the ground will always be on the eye level.
[Guide]……The pair of lines stretching from the vanishing point. They will always be attached to a vanishing point.
Other than as guides when drawing, they are used as controllers when deciding the position of vanishing points.
[Support]……Lines that are only displayed when drawing one-point perspective or two-point perspective. They are support lines that indicate the vertical lines in the height direction.
Support lines can be used as drawing guides as they can be moved with the [Object] tool.
[Handle]……Handles that are used to control the elements of the entire ruler, vanishing points, guide lines and support lines.
Perspective Drawing
For some reason perspective drawing is looked on as a complicated intrusion into the fun side of painting. In this article we will take a very simple approach to remove the complication from an indispensable drawing tool.
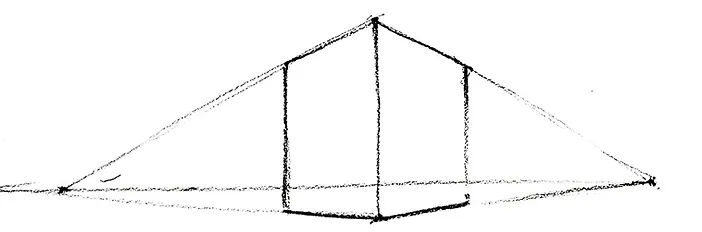
Perspective drawing is a technique to create the linear illusion of depth. As objects get further away from the viewer they appear to decrease in size at a constant rate. The box in the sketch below appears solid and three dimensional due to the use of perspective.


The closest part of the box to us is the front vertical edge. The two other visible vertical edges, being further away, appear shorter. To find the length of these lines we need to know where our eye level is in relation to the box and where the two vanishing points along the eye level line will be for all our horizontal lines to recede to.
Because the box is square and our angle of view to the box is forty five degrees, the vanishing points will each be the same distance from the box.
Finding the Eye Level or Horizon Line for Perspective
The horizontal line through the box indicates our eye level and will vary according to our vantage point in relation to the box.
In the box above, our eye level is about a quarter the way up the front edge. Horizontal lines below the Eye Level will appear to slope up to the vanishing point and those above the Eye Level will appear to slope down.

In the sketch above, our eye level is below this box so all horizontal lines will appear to slope down.

Here our Eye Level is above this box, so all horizontal lines will appear to slope up.
By looking carefully at the horizontal lines in whatever it is we want to draw we can work out the direction to the vanishing points and the location of the Horizon Line or Eye Level.
If all the horizontal lines in the subject appear to slope up (as above), the Eye Level will be above the subject.
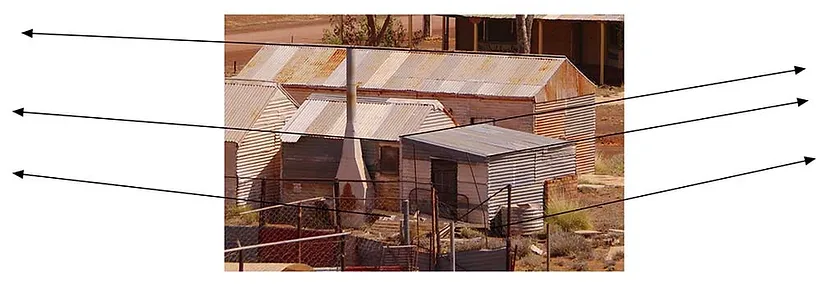
If all the horizontal lines in the subject appear to slope down (as below) the subject will be above the Eye Level.
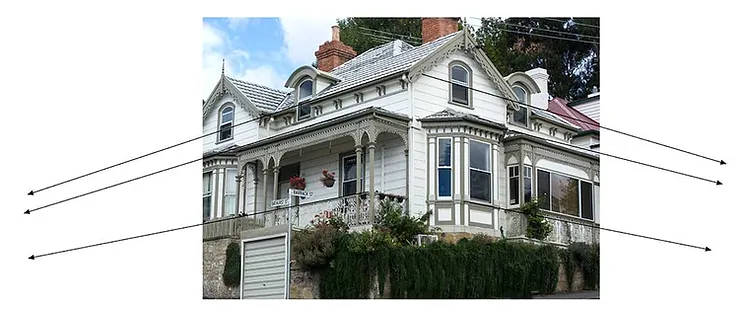
If some of the horizontal lines in our subject slope up and some slope down (as below), our Horizon or Eye Level Line will be within the subject.
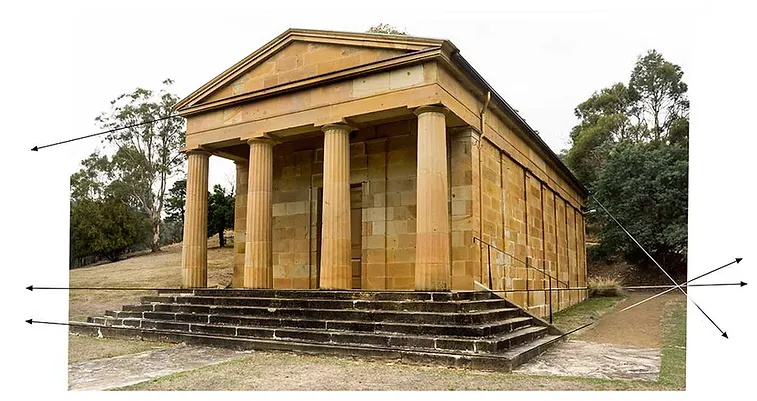
In all three examples, where these converging lines cross will be the vanishing points and they will always cross on the Horizon or Eye Level Line.
Finding Perspective Vanishing Points
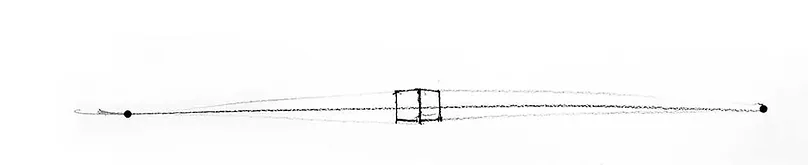
The two things that determine how far from our object the vanishing points will be are our distance from the object and our angle of view to the object. The closer we are to the object, the closer the vanishing points will be and the more extreme the perspective (sketch below).
As we move away from the object the effect of perspective diminishes and the vanishing points move outwards, away from the object (sketch below).

Changing our angle of view to the object will cause one vanishing point to move closer to the object and one to move further away. In the sketch below, moving around the object to the right causes the vanishing points to move to the right. One gets closer and one, further away.
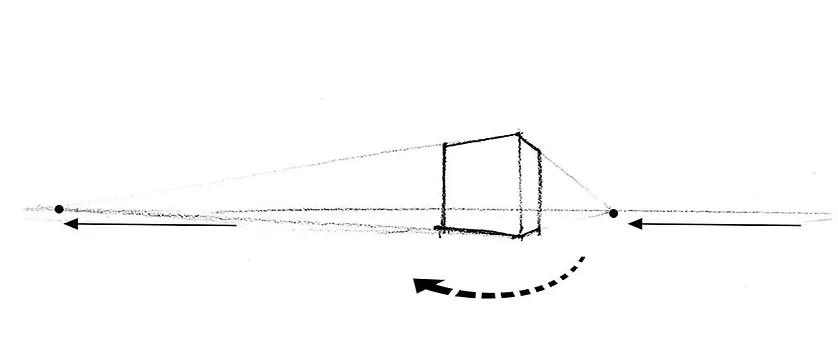
If we move around the box to the left the vanishing points move to the left. The left hand point moves further away, the right hand point moves closer.
If you can read through these notes and understand what is happening, you should then, with some practice, be able to draw a variety of little boxes like the ones above. Draw them from below, above, turned at various angles, from close up, further back - Once you become comfortable with a single box and how the changes in Eye Level and Vanishing Points effect perspective, building more complicated structures is just a matter of stacking, rearranging and modifying more boxes.

Understanding perspective drawing is an important part of your ability to draw but, no matter how accurate, it can also be the undoing of an otherwise good painting. Don’t let your work become over drawn and mechanical.
I rarely use a straight edge when perspective is involved, preferring to sketch the lines in by hand without running everything accurately back to a vanishing point. The slight inaccuracy's add a looseness to the work and get away from that tight, clinical look.

This painting of London uses a simple, single vanishing point perspective. You can see where the vanishing point would be by following the converging lines on the right. The lines are approximate (as accurate as I can judge by eye), but if a straight edge was placed along them they would be less than perfect, taking away that mechanical appearance and giving the painting a looseness that reinforces the ancient patina of the city. In drawing these lines it is not my intention to make them inaccurate, but, thankfully, the unassisted eye does not have the precision of a ruler.

The vanishing points in this painting of Venice are scattered all along the horizon line due to the fact that very few of the buildings are built parallel to one another. They are all individual little boxes turned at slightly different angles.
It may seem a chore and something you can work around but it really is not that difficult. Spending a few hours with a pencil and paper is all it takes to become familiar with what is happening.
Perspective drawing problems are some of the most common problems I see with students. Once you get started it’s a lot of fun and does more to improve your work than all the best art materials will ever do.
Learn the Basics of Perspective to Create Drawings That Pop Off the Page
Two-point perspective drawing of a mall (Photo: Stock Photos from Zoltan Major / Shutterstock)
Drawing is full of fundamental techniques that will improve how you create art. And if you like to draw realistically, understanding these methods is vital. Perspective is one of these approaches that will help you become a better draftsperson—especially when it comes to architecture.
What is perspective drawing in art?
Perspective drawing gives objects on a 2D surface a sense of three-dimensionality. There are two types of perspective: linear perspective and atmospheric perspective.
Basics of Linear Perspective
When we talk about one, two, or even three-point perspective, we’re talking about linear perspective. It's a method of representing space in which the scale of an object diminishes as the distance from the viewer increases. Essentially, objects that are farther away from us appear smaller than those that are near. The position at which they meet at a horizon line (the intersection of where the ground meets the sky) is called the vanishing point.
Linear perspective might seem rudimentary but it wasn’t until the Renaissance that it had a name. In 1413, Italian architect Filippo Brunelleschi began developing linear perspective and the method that many artists use today. He started by painting the outlines of Florentine buildings in a mirror and saw that when the structure’s outline was continued, the lines ended on the horizon line.
Brunelleschi’s discovery was a major influence on artists at the time. Many years later, his friend Leon Battista Alberti penned De Pictura, the first treatise on linear perspective that explained how to correctly show distance in a painting using mathematic principles first proven by Euclid in ancient Greece.
ONE-POINT PERSPECTIVE
One of the best illustrations of single-point perspective is to imagine that you’re looking at a straight road. All of the elements of the composition—particularly the road itself—will converge at a single point on the horizon line.

Photo: Francisco Delgado
Single-point perspective can be at any point along the horizon line; the only stipulation is that all lines lead to the solitary point. Although elementary, it is evident in iconic works of art.
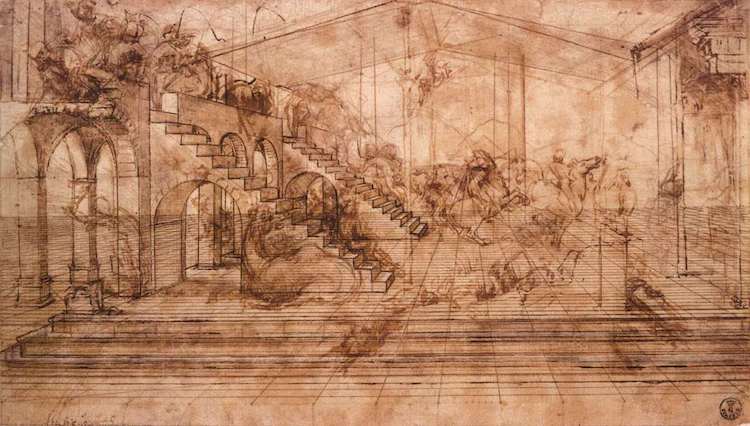
Perspectival study for “The Adoration of the Magi,” c. 1481
Leonardo da Vinci best exemplifies this in his perspectival study for The Adoration of the Magi around 1481. This incredible sketch demonstrates the great lengths that da Vinci went through to determine the focal point of the piece. Notice how the lines, from the steps to the arches, all converge at the same spot on the horizon line.
TWO-POINT PERSPECTIVE
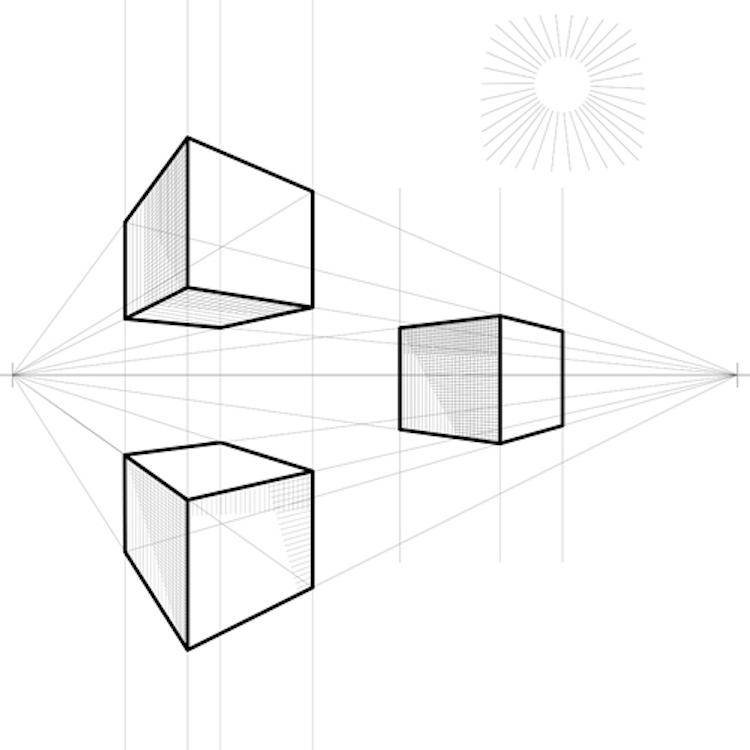
Cube in two-point perspective (Photo: Stock Photos from kavalenkava / Shutterstock)
Just as one-point perspective focuses on one vanishing point, two-point perspective ushers in a second one. Typically, these two points are at the opposite sides of the composition, such as one on the far left and another on the far right.
THREE-POINT PERSPECTIVE
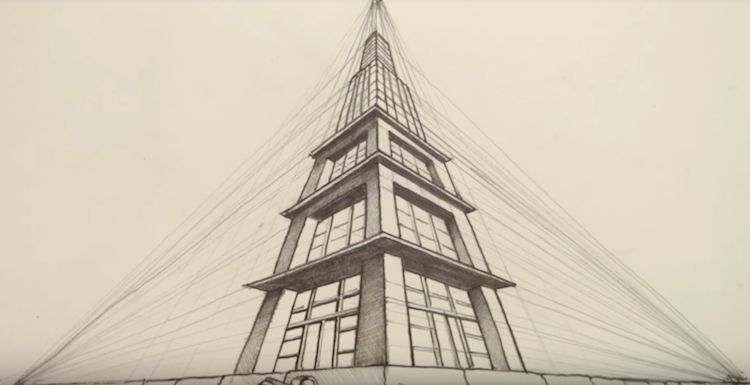
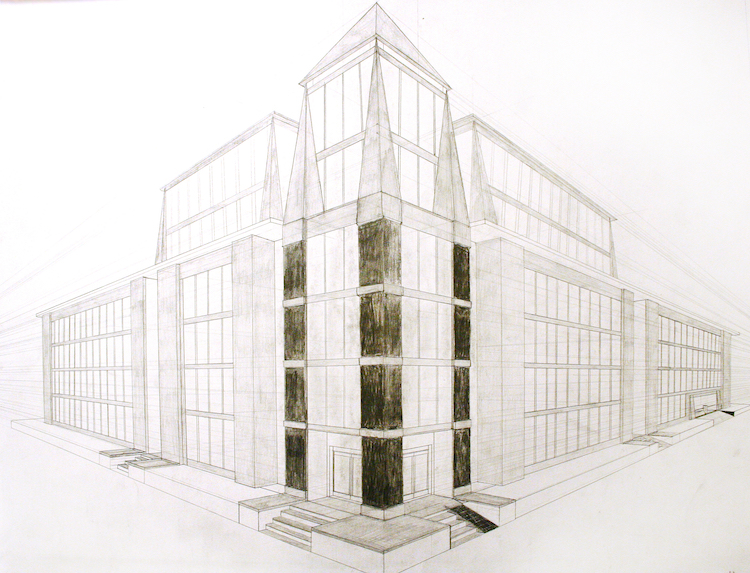
Image: Circle Line Art School
Three-point perspective, also called multi-point, is a type of perspective that has more than two vanishing points. This is common, especially as the complexity of the subject matter grows. A standard setup features two vanishing points on the far left and far right of the composition and then the third point below them. In doing this, you get a bird’s eye view to the subject. If you were to place the third point above the two vanishing points, it would create an extreme view looking upwards.
Introduction to Atmospheric Perspective
Linear perspective is based on mathematics and straight lines, but atmospheric perspective relies on something entirely different. Also called aerial perspective, it conveys depth through value changes, colors, and visual clarity.
One of the best ways to illustrate atmospheric perspective is in a landscape photograph. Imagine you’re viewing a mountainscape far in the distance. The formations closest to you will look the most colorful and in the greatest detail. As the mountains appear farther away, they have a dull, bluish cast covering them.

Photo: Guillaume Briard
How does this happen? In atmospheric perspective, water, vapor, and even smog affect what you see. As there’s more distance between you and a form, the increased particles result in less visual contrast. It also has to do with color wavelength. Blue color waves tend to bounce around these particles, which is why things take on this hue from long distances.
This idea, that things closer to you are brighter and easier to see, goes hand-in-hand with values in compositions. Things that are high contrast (a combination of light tones and dark tones) are more eye-catching than low contrast. In the above painting by artist Adem Potaş, the trees in the backdrop practically disappear because their tone is nearly the same as the rest of the sky.
Learn How to Create Your Own Perspective Drawings
Now that you’ve been introduced to the basics, it’s time to practice your perspective drawing.
DRAWING LINEAR PERSPECTIVE: ONE, TWO, AND THREE POINTS
Circle Line Art School has created three in-depth videos that explain how to draw with one or more vanishing points. Each production is narrated step-by-step and demonstrates sketching a building (or buildings). All you need is your favorite set of drawing pencils, an eraser, and ruler.
TIPS ON HOW TO INCORPORATE ATMOSPHERIC PERSPECTIVE IN YOUR WORK
Artist Lineke Lijn explains how she creates atmospheric perspective in her work and how you can incorporate it into your work, too.
Need more inspiration? Here's some art we love that features perfect perspective.

Artist: Paul Heaston
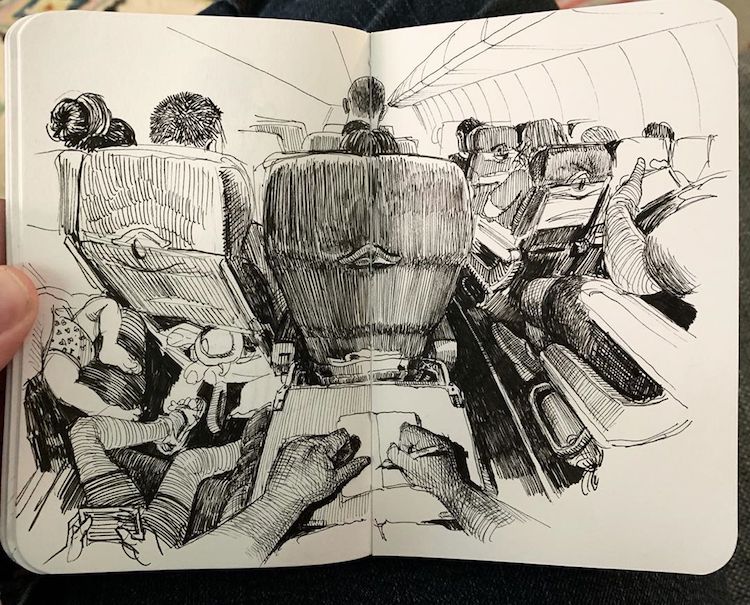
Artist: Paul Heaston

Palace of Westminster, London. Artist: Lorenzo Concas
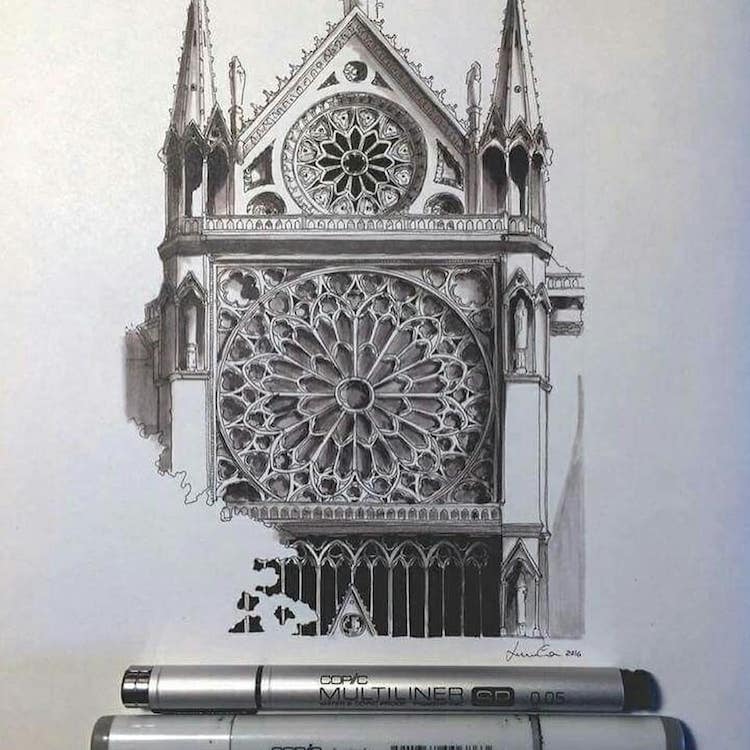
Notre-Dame Cathedral, Paris. Artist: Lorenzo Concas
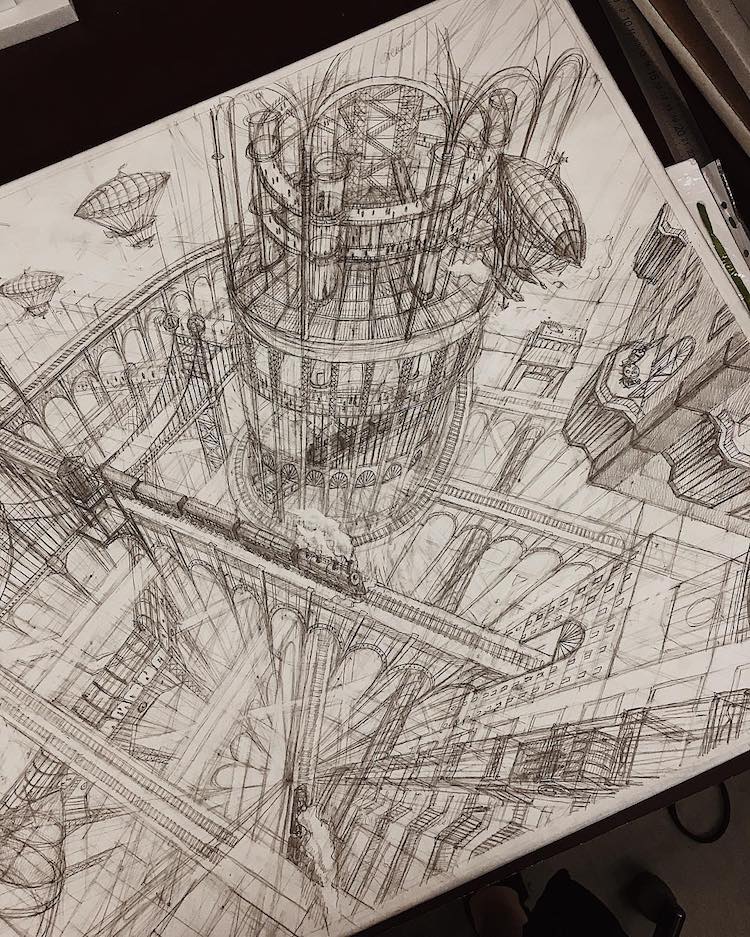
Artist: Aysylu Zaripova
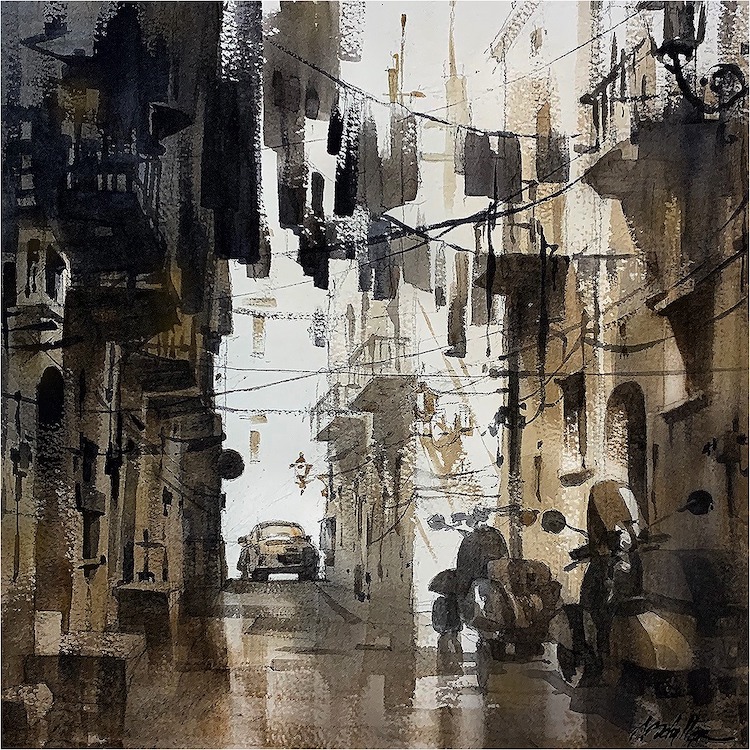
Artist: Thomas W. Schaller
- Get link
- X
- Other Apps


Comments
Post a Comment