In the November 2013 issue of The Artist’s Magazine, Sadie Valeri teaches you how to draw a value sphere from start to finish by using a controlled graphite shading technique to render the tonal value variations caused by a light shining on a three-dimensional object.For Study of Female Hand Cast (cropped image; graphite, 8×10), I used my controlled pencil shading technique to model the form of knuckles, fingers, and hand (all incorporating spherical shapes), and to capture the way light behaves on a complex, three-dimensional form.
1. Block In the Contour
The first step in learning to draw a sphere is to draw a circle. Lightly sketch a square, and then slice off the corners to make a sketchy octagon. Next, indicate a direct light source that’s angled 45 degrees slightly toward the sphere. Draw the terminator. The distinct, conceptual line between the two halves marks the ending of the light, so we call the line the terminator and draw it perpendicular to the light source. Sketch the cast shadow.
2. Refine the Contour
,h2>Smooth out the circle contour, continuing to slice off corners of the evolving polygon shape in progressive steps—carefully and methodically proceeding until a smooth circular form emerges. Pencil in the two “poles” of the terminator and sketch an ellipse to represent the terminator between these two poles.
3. Fill in the Shadows
Using the softer H pencil, fill in the form shadow (the shadow side of the sphere) and the cast shadow with one even, medium tone.
4. Shade In the Sphere (Turn the Form)
Use shading to make the sphere appear round. Making an object look three-dimensional is called turning the form.
5. Refine Shading
Finesse your modeling on the sphere. Layer H and 2H pencil shadings one over the other. Refine the cast shadow. The place where the sphere sits on the ground and touches the cast shadow should be very dark since no direct light can reach there. Develop the reflected light as you refine the shading. Keep the area of reflected light subtle; you may find you even need to darken it.
6. Do the Final Shading
Shade in the background and surface. If your goal is a completed drawing, filling in an even tone for the background and a lighter tone for the ground the sphere rests on will result in a nice, finished look. Refine all values, continuing to adjust them across the entire drawing, layering H and 2H pencils as necessary. When your drawing is successful, your sphere will look as though it could roll right off the page, or as though you could pick it up. That’s when you know you’ve captured the illusion of three-dimensional form.
Art Material Glossary Facts in books, information in glossaries, the ability to use them in our heads! If you are new to the arts you may have problems to decipher certain art material terms used in the arts field. Or you wonder what brand to get. To help you along, I added this little glossary as a guideline to make it easier to find the right materials when starting to draw or paint. Save Drawing Materials GRAPHITE PENCILS There are varied types of graphite pencils. When you buy a set, make sure that you get one with a 4h and 2h otherwise buy them single. All brands are really fine. I personally use the Faber Castell graphite and Staedler pencils. Staedler is cheaper and a little lighter than the Faber Castell. Faber Castell are the only pencils with an added inner core strength so that the pencils don't break inside when they fall. SKETCHPAD The paper we draw on is of importance. In my time as commercial illustrator I tried man...
Learn How to Draw a Dog with This Simple Step-by-Step Sketching Guide By Sara Barnes on September 4, 2019 How to Draw a Dog Body Step by Step The easiest way to start drawing anything is to break it down into its simplest form and then gradually refine its details. This makes even the most daunting subjects accessible. Photo: Jamie Street For this exercise, you’ll want to find a photo of a dog. Generally, it’s best to draw from life whenever possible—it helps keep your observation skills sharp. But for a subject like a dog, which moves a lot , opt for a still image instead. STEP 1: STUDY YOUR SOURCE PHOTO. Photo & art: Sara Barnes / My Modern Met Just because you aren’t drawing the dog from life doesn’t mean you’re free of observation. In fact, a photograph gives you even more opportunity to study your subject. Before putting pencil to paper, take time to look at your photo. Start to note all of the things you see. How are the legs...
STEP BY STEP OIL PASTEL PORTRAIT USING SCRAPING TECHNIQUE March 12, 2020 Team Camlin Articles Leave a comment Want to try your hands on a simple, yet interesting way of creating portraits? We have something special for you! Here’s a quick guide on how you can create a quick portrait with an easy Scraping Technique using Camlin Oil Pastels. What you will need: • Board • Camlin A4 Size Drawing Paper • Double Sided Tape • Camlin Oil Pastels & Scraping Tool Step 1: Take a blank A4 size Camlin Drawing Paper and tape it onto a board for support, with a Camlin Oil Pastel box and Scraping Tool by your side. Step 2: Grab some bright oil pastels from the wide number of shades available in the Camlin Oil Pastels box and start colouring various patches to create a colourful and vibrant base. Step 3: Using the black Camlin Oil Pastel, add a layer of black colour on the base colours, and keep colouring until you cover the whole paper. Step 4: It’s now time t...

 The first step in learning to draw a sphere is to draw a circle. Lightly sketch a square, and then slice off the corners to make a sketchy octagon. Next, indicate a direct light source that’s angled 45 degrees slightly toward the sphere. Draw the terminator. The distinct, conceptual line between the two halves marks the ending of the light, so we call the line the terminator and draw it perpendicular to the light source. Sketch the cast shadow.
 Smooth out the circle contour, continuing to slice off corners of the evolving polygon shape in progressive steps—carefully and methodically proceeding until a smooth circular form emerges. Pencil in the two “poles” of the terminator and sketch an ellipse to represent the terminator between these two poles.
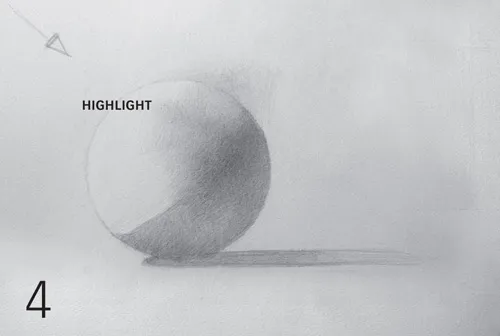 Use shading to make the sphere appear round. Making an object look three-dimensional is called turning the form.


Comments
Post a Comment